
.png)


.png)
10 Proven Methods for How to Open a Glass Bottle Without a Bottle Opener
novembre 17, 2025
Abstract
This document examines the practical application of elementary physics principles to solve the common predicament of opening a crown-cork sealed glass bottle without a purpose-built opener. It moves beyond a mere listing of techniques to a deeper exploration of the mechanical concepts of leverage and force concentration that underpin each method. The analysis considers a range of common objects—from keys and spoons to countertops and even a sheet of paper—as improvised tools, evaluating them based on efficacy, safety, and the potential for damage to the tool, the bottle, or the user. By framing the challenge as a puzzle of applied mechanics rather than a test of brute strength, this exploration seeks to empower individuals with a systematic and safe approach. The discussion also touches upon the material science of the glass bottle and metal cap, providing a comprehensive understanding of why these improvised methods are successful. The objective is to cultivate a mindset of mechanical ingenuity and risk assessment, transforming a moment of frustration into an opportunity for thoughtful problem-solving.
Key Takeaways
- Leverage is the core principle; find a fulcrum on the bottle's neck.
- Use a sturdy, non-brittle object to pry the cap's edges upward.
- Work your way around the cap, prying small sections at a time.
- The safest method for how to open a glass bottle without a bottle opener involves minimal force.
- Always prioritize personal safety and the integrity of the glass bottle.
- Protect surfaces from scratches or dents when using them as a lever.
- A firm grip on the bottle is as vital as the tool you choose.
Table of Contents
- The Physics Behind Uncapping a Bottle
- Choosing Your Improvised Tool: A Comparative Analysis
- Method 1: The Resolute Key
- Method 2: The Unyielding Edge of a Counter or Table
- Method 3: The Versatile Pair of Scissors
- Method 4: The Humble Spoon or Butter Knife
- Method 5: The Convenient Belt Buckle
- Method 6: The Deceptively Strong Piece of Paper
- Method 7: The Lighter as a Lever
- Method 8: The Daring Inverted Bottle Technique
- Method 9: The Steadfast Door Frame Latch
- Method 10: The Ring as a Last Resort
- The Anatomy of the Glass Bottle: Why This All Works
- When Things Go Wrong: Troubleshooting and Prudent Responses
- Frequently Asked Questions (FAQ)
- A Final Thought on Ingenuity
- References
The Physics Behind Uncapping a Bottle
Before we venture into the practical methods, it is intellectually rewarding to first grasp the scientific principles at play. The act of opening a bottle is not magic, nor is it a feat of pure strength. It is, in its essence, a beautiful demonstration of classical mechanics, a small-scale ballet of forces and levers that anyone can direct. Understanding this foundation transforms the task from a frustrating obstacle into an engaging puzzle.
Understanding the Crown Cork: A Feat of Engineering
The standard bottle cap, known technically as a crown cork, was invented by William Painter in 1892. Its design is a marvel of efficiency. It consists of a small, round piece of metal, which is fluted into a corrugated edge of typically 21 points or "teeth." Inside, a soft liner creates an airtight seal against the bottle's lip, preserving the contents and their carbonation. The genius of the crown cork lies in how it grips the flange of the bottle's opening. Those small teeth are crimped underneath that glass lip, holding the cap on with surprising tenacity against the internal pressure of a carbonated beverage. Your challenge is not to fight that entire force at once, but to systematically undo the grip of these teeth.
The Principle of the Lever: Your Secret Weapon
The most fundamental concept you will employ is the principle of the lever, a simple machine known since antiquity. A lever allows you to multiply the force you apply. Think of a seesaw on a playground. A small child can lift a much heavier adult if they are positioned correctly. The lever system has three components:
- The Lever Arm: This is the object you will use to pry, such as a key, a spoon, or a lighter.
- The Fulcrum: This is the pivot point. In our case, the fulcrum will almost always be the top of your index finger, placed just under the cap against the bottle's neck.
- The Force (or Effort): This is the upward pressure you apply to the long end of your lever arm.
By placing the fulcrum (your finger) close to the point where the lever acts on the cap (the resistance), you create a significant mechanical advantage. A small upward push with your hand becomes a much stronger lifting force right under the cap's edge.
Identifying a Fulcrum and Applying Force
Imagine you are holding the bottle neck firmly. Your index finger is wrapped around it, and the knuckle is pressed right up against the underside of the cap. Now, you wedge the tip of your chosen tool—let's say a key—under one of the cap's teeth, so the key is resting on your knuckle. Your knuckle is the fulcrum. The part of the key under the cap is the short end of the lever, and the part you hold is the long end. When you lift the long end of the key, the short end pivots on your knuckle and pushes up on the cap with much greater force. You are not trying to rip the cap off in one go. Instead, you apply this force to one point, slightly bending that part of the cap up. Then, you rotate the bottle slightly and do it again on the next section. You are progressively weakening the cap's grip, one tooth at a time.
Safety First: Assessing Risks Before You Begin
Before attempting any of these methods, a moment of reflection is paramount. We are dealing with glass, which can break under stress, and metal tools, which can slip. The primary goal is to open the bottle, but the absolute, non-negotiable prerequisite is to do so without injury. Always inspect the bottle neck for any pre-existing cracks or chips. A compromised bottle is a significant hazard and should not be subjected to these methods. Ensure your hands are dry for a firm grip. When applying force, direct it away from your body. The process should feel controlled; if you find yourself needing to exert violent, uncontrolled force, you should stop and reconsider your technique. The elegance of these solutions lies in finesse, not fury.
Choosing Your Improvised Tool: A Comparative Analysis
The world is full of potential bottle openers, but not all are created equal. The choice of tool depends on availability, the user's comfort with the technique, and an assessment of the risks involved. The following tables offer a structured comparison to aid in this decision-making process, evaluating each method based on several key criteria.
Table 1: Tool Effectiveness and Risk Assessment
| Method/Tool | Ease of Use | Risk of Bottle Damage | Risk of Personal Injury | Risk of Tool/Surface Damage |
|---|---|---|---|---|
| Key | Moderate | Low | Low-Moderate | Moderate (bending key) |
| Counter Edge | Moderate-High | Moderate | Low | High (denting/chipping) |
| Scissors | High | Low | Moderate (slipping blade) | Low |
| Spoon/Knife | High | Very Low | Low | Very Low |
| Belt Buckle | Moderate | Low | Low | Moderate (scratching) |
| Paper | Low | Very Low | Very Low | N/A (paper is consumed) |
| Lighter | High | Very Low | Low | Low |
| Inverted Bottle | Low-Moderate | High | Moderate-High | High (breaking both bottles) |
| Door Latch | High | Moderate | Low | High (damaging frame/latch) |
| Ring | Low | Low-Moderate | Moderate | High (damaging ring) |
Table 2: Situational Guide: The Right Tool for the Occasion
| Situation | Recommended Tool(s) | Rationale |
|---|---|---|
| Picnic / Outdoors | Spoon, Key, Lighter | These are common items to have on hand. The spoon is the safest and most reliable choice. |
| At Home (Kitchen) | Spoon, Butter Knife | The ideal tools are readily available, designed for hand-held use, and pose minimal risk. |
| Office Environment | Scissors, Key | Common desk items that can be used discreetly and effectively. Scissors are particularly effective. |
| Workshop / Garage | Screwdriver, Wrench | While not detailed here, the same lever principle applies. Choose a flat-head screwdriver. |
| No Tools Available | Counter Edge, Paper | These methods rely on the environment or basic materials. Use caution with surfaces. |
| Party Trick | Paper, Lighter | These methods have a certain flair and are more surprising, making them entertaining to perform. |
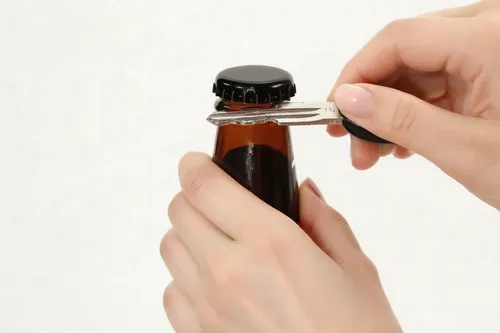
Method 1: The Resolute Key
A key is an object most people carry at all times, making it one of the most convenient improvised openers. Its utility lies in its rigid metal construction and thin, flat edge. However, not all keys are suitable. An ideal key is sturdy and one you are not afraid of slightly damaging. A thick house key is preferable to a thin, flimsy key for a mailbox or a car key with an electronic chip.
The Physics in Action
The key acts as a small, robust lever. You will use your index finger as the fulcrum. The tip of the key is wedged under the cap's lip, and the body of the key rests on your finger. The force you apply lifting the key's bow (the part you hold) is multiplied at the tip, prying the cap upward.
Step-by-Step Guide
- Grip the Bottle: Hold the neck of the bottle firmly in your non-dominant hand. Your fingers should be wrapped securely around the glass.
- Position Your Fulcrum: Place your dominant hand's index finger underneath the cap, curling it so the top of your finger presses firmly against the glass neck. This finger will act as the pivot point.
- Insert the Key: Take a sturdy key and hold it so the long side is parallel to your fingers. Slide the tip of the key into the space between your index finger and the bottom edge of the bottle cap. You want to catch one of the small metal teeth of the cap.
- Apply Leverage: With the key's tip securely under a tooth and the key's shaft resting on your index finger, begin to lift the other end of the key upwards. It is like a tiny seesaw. You should feel the key's tip push up against the cap.
- Twist and Repeat: Do not try to force the cap off in one motion. The goal is to slightly bend one section of the cap upwards. Once you have done this, rotate the bottle a few degrees in your hand and repeat the process on a new section of the cap. After prying three or four different points, the cap's seal will be weakened enough to pop off with minimal effort.
Precautions and Pitfalls
The primary risk with this method is damaging the key. If you use a soft metal key and apply too much force, you could bend or even break it. Choose your key wisely. There is also a small risk of the key slipping and scraping your hand. Maintain a firm, controlled grip throughout the process. The motion is a lift, not a violent jerk.
Method 2: The Unyielding Edge of a Counter or Table
This method is highly effective but comes with a significant caution: you risk damaging the surface you use. It should be reserved for sturdy, non-precious surfaces like a granite countertop, a solid wood workbench, or a concrete ledge. Never attempt this on a delicate wood veneer, laminate, or tile surface that could easily scratch, dent, or crack.
The Physics in Action
In this scenario, the countertop edge acts as the lever, and the bottle itself becomes the force applicator. You are using the immovable surface to catch the edge of the cap and then applying a sharp, downward force with the bottle. The cap's lip is caught, and the downward momentum of the bottle provides the energy to deform and remove the cap.
Step-by-Step Guide
- Select Your Surface: Identify a hard, sturdy edge. Inspect it to ensure it has a sharp enough corner to catch the cap but is robust enough not to be damaged. A slightly rounded edge will not work.
- Grip the Bottle: Hold the bottle firmly by its main body. You need a secure grip because you will be striking downwards.
- Position the Cap: Place the top of the bottle against the underside of the counter edge so that one of the cap's teeth is hooked securely on the edge. The bottle should be at a slight angle, not perfectly vertical.
- The Strike: This is the most critical step. It is not about raw power. It is about a short, sharp, confident strike. With the cap's edge caught, strike the top of the bottle cap downwards with the palm of your other hand. The force should be directed straight down. A common mistake is to try to pull the bottle outwards or use a long, sweeping motion. A quick, decisive tap is all that is needed. The cap should pop off.
- Start with Less Force: If you are hesitant, start with a lighter tap and gradually increase the force on subsequent attempts until you find the sweet spot. A successful attempt often makes a very satisfying "pop."
Precautions and Pitfalls
The greatest risk is damage to property. A miscalculation can leave a permanent dent or scratch on a beautiful piece of furniture or a kitchen counter. Be absolutely certain that the surface can withstand the impact. There is also a non-zero risk of the bottle breaking if you strike it at a bad angle or with excessive, uncontrolled force. Focus the blow directly on the cap, not the neck of the bottle. This method requires confidence; a hesitant, weak tap will not work and may cause the bottle to slip.
Method 3: The Versatile Pair of Scissors
A pair of sturdy scissors, often found in a kitchen drawer or on an office desk, can be an excellent and surprisingly safe bottle opener. We are not using the blades to cut anything, but rather using the thick, strong back of one of the blades as a lever.
The Physics in Action
This method is almost identical in principle to using a key or a spoon. One of the scissor blades acts as the lever arm, and your index finger serves as the fulcrum. The advantage of scissors is that the metal is typically very strong, and the handle provides an excellent grip for applying upward force.
Step-by-Step Guide
- Choose Your Scissors: Opt for a robust pair of kitchen shears or office scissors. Avoid small, delicate sewing scissors.
- Open the Scissors: Open the scissors wide. You will only be using one of the two blades. Grip the handle of one blade firmly.
- Grip the Bottle and Position the Fulcrum: As with the key method, hold the bottle neck securely in your non-dominant hand. Place your index finger just under the cap to act as the fulcrum.
- Position the Blade: Place the open scissor blade so that the sharp edge is facing away from your hand for safety. Wedge the back (the dull, thick side) of the blade between your fulcrum finger and the lip of the bottle cap, catching a tooth.
- Lever and Pry: With the blade in position, use the scissor handle to lift upwards. The thick metal of the blade provides a very effective and rigid lever.
- Rotate and Repeat: Apply pressure to one spot, then rotate the bottle and repeat on another spot. A few small, controlled prying motions are far more effective and safer than one large one. The cap will loosen and can be easily popped off.
Precautions and Pitfalls
The main danger lies in the sharp edge of the scissor blade. Always ensure the sharp part of the blade you are using is pointing away from your hand and body. If your grip slips, you could get a nasty cut. Using the back of the blade minimizes this risk, but care is still required. Do not use the very tip of the scissors, as it is weaker and more likely to slip. Use the sturdier part of the blade closer to the pivot point of the scissors.
Method 4: The Humble Spoon or Butter Knife
This is arguably the gold standard of improvised bottle opening. A metal spoon is an item found in nearly every home, picnic basket, and breakroom. It is sturdy, has no sharp edges to worry about, and is ergonomically well-suited for the task. A butter knife works in precisely the same way.
The Physics in Action
Once again, we are employing a simple Class 1 lever. The spoon is the lever arm, your index finger is the fulcrum, and the tip of the spoon is what applies the concentrated force to the cap's edge. The shallow curve of the spoon tip is particularly effective at hooking under the cap's teeth.
Step-by-Step Guide
- Select Your Utensil: A sturdy metal teaspoon or tablespoon is perfect. The thicker the metal, the better, as it will not bend. A standard butter knife is also an excellent choice.
- The Grip: This is the most important part of the spoon method. Hold the bottle neck with your non-dominant hand. Instead of just placing your index finger under the cap, make a loose fist around the neck and leave your index finger sticking out straight, pressed firmly against the neck right under the cap.
- Position the Spoon: Now, take the spoon in your dominant hand. Slide the very tip of the spoon into the small gap between your rigid index finger and the cap's lip. The back of the spoon's bowl should be facing up.
- Create the Lever: Push the spoon inwards so it is held firmly in place. The spoon should be resting on the knuckle of your index finger. Your finger is the fulcrum.
- Pry Upwards: With a firm grip on the handle of the spoon, pry upwards. All the force will be concentrated on the small point of contact between the spoon tip and the cap. You will feel the cap bend slightly.
- Work Around the Cap: Rotate the bottle a quarter turn and repeat. And again. After two or three prying motions, the cap will often pop off with a satisfying hiss.
Precautions and Pitfalls
This method has very few downsides. It is one of the safest and most reliable techniques. The primary mistake people make is not getting a firm enough grip or not using their index finger as a solid, immovable fulcrum. If your finger is too loose, you will just be pushing your own finger down instead of lifting the cap up. The spoon might get a tiny scratch, but it is highly unlikely to be damaged. This is the method to teach a friend and the one to rely on in most situations.
Method 5: The Convenient Belt Buckle
In a situation where you might not have access to kitchen utensils or keys—perhaps at a barbecue or an informal outdoor gathering—an item of clothing can come to the rescue. A sturdy, metal belt buckle can function as an effective, if unconventional, bottle opener.
The Physics in Action
The principle remains the same: leverage. The edge of the belt buckle will serve as the prying tool. Depending on the buckle's shape, you might use a flat, sturdy edge of the buckle's frame. You are essentially using the buckle as a fixed, hard edge against which you can lever the bottle cap.
Step-by-Step Guide
- Assess Your Buckle: This method is entirely dependent on the type of belt buckle you have. It needs to have a solid, hard edge. A large, flat, rectangular "plaque" buckle or the sturdy frame of a traditional buckle works best. Flimsy or highly ornate buckles may be damaged or lack a suitable edge.
- Remove the Belt (Optional but Recommended): While you can perform this maneuver with the belt still on, it is far easier and safer to take it off. This gives you much better control.
- Find the Edge: Hold the buckle in your non-dominant hand. Identify the best edge to use as your prying surface. This will be your stationary "counter edge."
- Grip the Bottle: Hold the bottle firmly in your dominant hand.
- Hook the Cap: Bring the bottle to the buckle. Hook the lip of the bottle cap over the edge of the buckle you have chosen.
- Apply Downward Force: Just like with the countertop method, the final action is a sharp, downward tap on the bottle. You can use your palm to strike the top of the cap. The goal is to use the bottle's momentum to force the cap against the unmoving buckle, causing it to deform and pop off. Alternatively, for some buckle shapes, you can hold the buckle and bottle together and use a levering motion, similar to the key method.
Precautions and Pitfalls
The risk of damaging the belt buckle is real. You can easily scratch the finish or even bend a weaker part of the metal. Choose a buckle you are not sentimentally attached to. There is also a risk of the bottle slipping and either striking your hand or breaking. As always, a controlled, confident motion is key. Avoid this method if the buckle is made of soft metal or plastic.
Method 6: The Deceptively Strong Piece of Paper
This method borders on a magic trick, and it is a wonderful demonstration of how concentrating force can achieve surprising results. It seems impossible that a flimsy piece of paper could open a metal cap, but by folding it correctly, you create a tool that is temporarily hard enough for the job.
The Physics in Action
This technique does not rely on leverage in the same way as the others. Instead, it relies on creating an object so dense and rigid that it can function as a hard edge. By folding a piece of paper over and over, you create a thick, solid block. The strength comes from the lamination of many layers. You then use this block as a striking tool to catch the edge of the cap, similar to the countertop method, but with a handheld striker.
Step-by-Step Guide
- Get a Piece of Paper: A standard sheet of printer paper (like A4 or US Letter) is ideal. A dollar bill or a sturdy receipt can also work in a pinch.
- Fold it Tightly: The key to this method is the fold. Fold the paper in half lengthwise. Then fold it in half again, and again, and again. Keep folding it in half until you cannot possibly fold it anymore. You should be left with a very thick, very dense, small rectangle of paper. Squeeze it as tightly as you can to compact it.
- Grip the Bottle: Hold the bottle neck very firmly in your non-dominant hand. This grip needs to be rock-solid.
- Position Your Finger: Place your index finger so that it is bent, and the middle section of your finger is providing a hard surface just under the bottle cap. You are creating a backstop.
- Use the Paper Block: Hold the folded paper block firmly in your dominant hand. You will use the hard, folded edge as a striker.
- Strike Swiftly: The motion is a fast, flicking strike. You are aiming to hit the underside of the cap's lip, driving it upwards against the seal. The paper block hits the cap, and your index finger behind it stops the bottle from moving, concentrating all the force on the cap's edge. It is a very quick, upward-flicking motion against the cap. It may take a few tries to get the angle and speed right.
Precautions and Pitfalls
This is one of the safest methods in terms of potential for injury or damage. The paper is unlikely to hurt you or the bottle. The biggest "pitfall" is that it can be difficult to master. The fold must be extremely tight, and the strike must be swift and precise. It is a technique that rewards practice. It may not work well if your hands are wet, as the paper could lose its rigidity. This is more of a finesse move than a brute force one.
Method 7: The Lighter as a Lever
A disposable plastic lighter is a classic tool for this job, often seen at parties and concerts. Its hard plastic casing and rectangular shape make it a surprisingly effective lever.
The Physics in Action
The lighter functions as a short, sturdy lever arm, and the method is a perfect illustration of the Class 1 lever principle. The hard bottom edge of the lighter is the point of force application, while your index finger knuckle, pressed against the bottle, serves as the fulcrum.
Step-by-Step Guide
- Grip the Bottle and Fulcrum: This technique requires a specific grip. Wrap your non-dominant hand around the bottle's neck, but leave your index finger sticking straight out and pressed against the glass, just under the cap. This finger is your fulcrum and must be held rigidly.
- Position the Lighter: Take the lighter in your dominant hand. Place the bottom edge of the lighter on top of your index finger, right at the knuckle. Now, wedge the lighter inwards so that its bottom edge is also securely hooked under the lip of the bottle cap.
- Squeeze and Pry: The final motion is a combination of squeezing and prying. Squeeze your hand, which will press the lighter into the cap and use your index finger as a pivot. At the same time, apply downward pressure on the top of the lighter with your thumb or other fingers. This creates a powerful upward prying force on the cap's edge.
- Reposition if Necessary: Often, a single, strong prying motion is enough. If the cap is stubborn, you may need to rotate the bottle and repeat the action on another side to loosen it before it pops.
Precautions and Pitfalls
This method is generally safe. The plastic of a standard lighter is quite strong and unlikely to break. The main point of failure is an insufficiently rigid fulcrum finger. If your index finger bends when you apply pressure, you will lose all mechanical advantage. You must keep that finger straight and strong, like a piece of wood. There is a very slight risk of the lighter slipping, but the grip described above tends to hold it quite securely.
Method 8: The Daring Inverted Bottle Technique
This method should be considered a high-risk, high-reward maneuver, best reserved for when you have no other tools and are feeling particularly bold. It involves using the cap of another, unopened bottle to open your target bottle. It can be impressive when it works, but it has the potential to go spectacularly wrong.
The Physics in Action
The principle here is shear force. You are using the hard, rigid edge of one bottle cap to catch and pry off the other. The "tool" is another bottle, held upside down. The force is applied by striking the two caps together in a very specific way.
Step-by-Step Guide
- Find a Second Bottle: You need another bottle with the same type of crown cork. A twist-off cap will not work.
- Grip the Target Bottle: Hold the bottle you want to open firmly in your non-dominant hand. Keep your grip lower on the body of the bottle.
- Invert the "Opener" Bottle: Take the second bottle and turn it upside down. Grip it firmly around its body.
- Interlock the Caps: This is the crucial alignment. You want to place the inverted cap so that one of its metal teeth hooks directly underneath a tooth of the upright cap. You are interlocking the corrugated edges.
- The Strike: This is a very controlled, sharp impact. While holding the two caps interlocked, use the inverted bottle to strike downwards sharply. The idea is that the edge of the inverted cap will catch the lip of the upright cap and pry it off. This is NOT about smashing the bottles together. It is a precise, shearing blow.
Precautions and Pitfalls
The risks here are significant. The most obvious risk is breaking one or both bottles. Glass-on-glass impact is never ideal. If a bottle breaks, you are left with a dangerous mess and potential for serious injury. There is also a chance of chipping the lip of the bottle you are trying to open, which would release glass shards into your drink. Furthermore, there's a non-trivial chance you will accidentally open both bottles, or neither. This technique requires a great deal of practice to perform safely and effectively and is generally not recommended for novices.
Method 9: The Steadfast Door Frame Latch
Most interior doors use a latch plate, the metal plate on the door frame that the latch bolt fits into. The rectangular hole in this plate is made of hard metal and is securely fastened to a solid wood frame, making it an excellent, immovable prying point.
The Physics in Action
This method is a variation of the countertop technique. The edge of the latch plate hole acts as the fixed lever or prying point. The bottle, held in your hand, is the force applicator. You hook the cap on the edge and use downward momentum to pop it off.
Step-by-Step Guide
- Find a Suitable Door: Look for a standard interior door. The latch plate should be made of metal and securely screwed into the frame. Do not use this on antique, custom, or weakly-installed door frames.
- Grip the Bottle: Hold the bottle very securely by its body in one hand.
- Position the Cap: Approach the door frame and place the top of the bottle so that the lip of the cap is hooked onto the top edge of the hole in the latch plate. The bottle will be at a slight angle.
- Apply a Quick, Downward Motion: Similar to the countertop method, the key is a sharp, decisive downward movement. You can use your other hand to tap the top of the cap. The bottle's own weight, combined with your tap, will cause the hooked edge to pry the cap off. It should pop off cleanly.
Precautions and Pitfalls
The primary risk is damage to property. You can scratch the latch plate, chip the paint on the door frame, or even bend the plate and damage the wood if the frame is not solid or if you use excessive force. Be mindful of the home you are in. This is not a method to use on a host’s pristine new doors. There is also a small risk of the bottle slipping from the latch as you apply force. Ensure it is securely hooked before you commit to the motion.
Method 10: The Ring as a Last Resort
Using a ring on your finger is a method that requires caution and a specific type of ring. It can be effective, but the risk of damaging the ring or injuring your finger is higher than with many other methods. This should be considered a last-ditch effort.
The Physics in Action
Your ring, especially a sturdy one made of a hard metal like tungsten or titanium, acts as the hard edge for prying. Your finger and hand provide the structure and the force.
Step-by-Step Guide
- Assess Your Ring: This is critical. The ring must be made of a very hard, durable material. A soft gold or silver ring will be scratched, bent, or ruined. A wedding band made of a hard metal is often used. Do not use a ring with set stones, as you could easily damage the setting or lose a stone.
- Position Your Hand: Place your ring-wearing hand over the top of the bottle, with your fingers pointing downwards. Your palm should be flat on the cap.
- Hook the Ring: Curl your ring finger slightly so that the bottom edge of your ring hooks under the lip of the bottle cap.
- Grip and Pull: This is the tricky part. You need to maintain the hook with your ring finger while using the rest of your hand and arm to pull upwards in a quick, strong motion. It is a single, decisive yank. You are essentially using your whole arm to pry the cap off with the small contact point of your ring.
Precautions and Pitfalls
This method is fraught with risk. The most significant danger is to your ring. You can easily cause deep scratches or deform it. The second risk is to your finger. If your hand slips or the force is applied incorrectly, you could painfully jam your finger between the cap and the bottle. There is a real potential for bruising or even cutting yourself. This method requires considerable strength and a bit of pain tolerance, as the force is concentrated on your finger. It is not recommended unless you have a very sturdy ring you do not mind damaging and have no other conceivable option.
The Anatomy of the Glass Bottle: Why This All Works
Our ability to employ these improvised techniques is owed almost entirely to the specific design and material properties of the modern glass bottle. Understanding its construction provides a deeper appreciation for the task and can inform our approach, making it more effective and safer. The specific shape of the neck, the resilience of the glass, and the design of the lip are not accidental; they are the result of over a century of refinement in packaging technology (Reihey glass, 2023).
The Strength and Vulnerability of Glass
Glass is a fascinating material. It is an amorphous solid, meaning its atoms lack the long-range crystalline structure of metals. This gives it its transparency and also its characteristic brittleness. While a glass bottle is incredibly strong under compression (if you squeeze it from top to bottom), it is much weaker under tension or from a sharp, focused impact. This is why a bottle can shatter when dropped.
However, the glass used for beverage bottles, particularly for carbonated drinks that are under pressure, is designed to be robust. Manufacturers use precise formulations of silica sand, soda ash, and limestone, melted at high temperatures, to create a product that can withstand the rigors of bottling, transport, and handling berlinpackaging.com. The crucial thing for our purposes is that the neck and lip of the bottle are typically the thickest and strongest parts of the entire structure. This is by design, as this area must withstand the significant force of the capping machine during manufacturing. This inherent strength is what allows us to use it as a base for our lever without it breaking. The quality of these custom spirits glass bottles is a testament to modern manufacturing precision.
Understanding the Bottle's Lip (The Fulcrum Point)
Take a close look at the top of an unopened bottle. Below the metal cap, there is a distinct glass ring or flange. This lip is the anchor point for the crown cork's teeth. It is also the perfect, ready-made support for our improvised levers. When you place a spoon tip under the cap and rest the spoon on your index finger, your finger is pressing against the bottle neck, and the spoon is levering against the underside of this glass lip. The small, circular design of this lip provides a consistent and reliable surface all the way around the bottle, which is why the "rotate and repeat" strategy is so effective.
The Role of Bottle Design in Opening Techniques
Not all bottles are identical. A long-neck beer bottle offers a different grip and leverage dynamic than a short, stout soda bottle. The thickness of the glass lip can vary, as can the angle of the neck. Some designs might make it easier to seat a fulcrum finger, while others might be more slippery. The color of the glass, achieved by adding different metal oxides like chromium for green or cobalt for blue, does not significantly affect the mechanical properties for our purposes, but it is a key part of the product's branding and protection against UV light (Glass Packaging Institute, n.d.). The fundamental mechanics—a metal cap crimped under a glass lip—remain constant across all these variations.
When Things Go Wrong: Troubleshooting and Prudent Responses
Even with a clear understanding of the principles and careful execution, mishaps can occur. An effective problem-solver is not just someone who knows the ideal procedure, but also someone who can react calmly and correctly when things deviate from the plan.
Dealing with a Chipped Bottle Lip
This is the most common form of failure. If you apply force incorrectly or if there was a pre-existing flaw in the glass, you might chip the glass lip that the cap is crimped onto.
- Stop Immediately: Do not try to continue opening the bottle.
- Inspect the Damage: Carefully examine the bottle lip. If it is a tiny chip on the exterior, it may be safe. However, the great danger is that microscopic glass shards may have fallen into the beverage.
- Err on the Side of Caution: The only truly safe response is to discard the bottle and its contents. No drink is worth the risk of ingesting glass. Attempting to strain the beverage is not a foolproof solution, as tiny slivers can easily pass through a standard strainer.
What to Do if the Bottle Breaks
A full breakage is a more dramatic and dangerous failure. It is most likely to happen with high-risk methods like the inverted bottle trick or if the bottle was already compromised.
- Control the Area: Immediately ensure that no one, including pets, can walk through the area. The combination of broken glass and spilled liquid is a serious hazard.
- Protect Yourself: Before you begin cleanup, put on sturdy, closed-toe shoes and, if possible, thick gloves.
- Clean Up Systematically: First, pick up the large pieces of glass and place them in a thick paper bag or a cardboard box (not a thin plastic bag that they can cut through). Then, use a dustpan and brush to sweep the area thoroughly. Finally, to get the almost invisible tiny slivers, you can use a damp paper towel to blot the area. Press down gently and dispose of the paper towel.
Basic First Aid for Cuts
If a tool slips or the glass breaks and you sustain a cut, attend to it immediately.
- Apply Pressure: Use a clean cloth or bandage to apply firm, direct pressure to the wound to stop the bleeding.
- Clean the Wound: Once the bleeding has subsided, rinse the wound with clean water. It is not always necessary to use hydrogen peroxide or alcohol, as this can irritate the tissue. Mild soap and water are effective.
- Apply an Antibiotic and a Bandage: Apply a thin layer of antibiotic ointment and cover the cut with a sterile bandage.
- Seek Medical Attention: For deep cuts, wounds that will not stop bleeding, or if you suspect there is glass in the wound, seek professional medical attention without delay.
Frequently Asked Questions (FAQ)
-
What is the absolute safest method to open a glass bottle without an opener? The safest method is using a spoon or a butter knife. These tools are sturdy, lack sharp edges, are unlikely to be damaged, and the technique relies on controlled leverage rather than brute force or impact.
-
Is it ever safe to use your teeth? Absolutely not. Using your teeth is exceptionally dangerous. The force required can easily chip, crack, or even break a tooth, leading to extensive and expensive dental work. The enamel on your teeth is strong, but it is brittle and not designed for the kind of focused pressure needed to pry a metal cap.
-
Why does the paper method work? It seems impossible. The paper method works because of pressure and density. By folding the paper many times, you are not making the paper itself stronger, but you are creating a dense, laminated block. When you strike the cap, the force is concentrated into the very small area of the folded paper's edge. This high pressure over a small area is enough to deform the metal cap's lip.
-
Can these methods damage the beverage inside? If performed correctly, no. The methods are designed to act only on the cap and the very top of the bottle. The one exception is if you chip the glass lip, which creates the risk of glass shards falling into the bottle. If you suspect any glass has chipped, the beverage should be discarded.
-
I tried the countertop method and just made a dent in the wood. What did I do wrong? This is the primary risk of that method. The failure likely occurred in one of two ways: either the surface was too soft (e.g., pine, MDF, some hardwoods) to withstand the focused force, or the strike was not clean and direct, causing the bottle to scrape the surface. It is a reminder to only use this method on surfaces you are certain can handle it, like unfinished concrete or granite.
-
Which part of the scissors should I use? Always use the back, dull spine of the scissor blade, not the sharp, cutting edge. Open the scissors and use the thick, straight part of one blade as your lever. This is much stronger than the tip and eliminates the risk of cutting yourself.
-
For more information and a visual guide, where can I look? There are many resources available, and for a detailed breakdown of these techniques and more, you can review a dedicated guide on how to open a glass bottle without a bottle opener.
A Final Thought on Ingenuity
The challenge of opening a bottle without the designated tool is a miniature human drama. It is a moment where frustration can give way to ingenuity. What we find, upon reflection, is that the solution rarely lies in greater strength, but in a more thoughtful application of it. By understanding the simple, elegant principles of the lever and fulcrum, we transform everyday objects into keys that unlock a small, satisfying pleasure. It is a reminder that the world is full of potential solutions, waiting for a curious and observant mind to see them not for what they are, but for what they can become. This small act of resourcefulness is a quiet celebration of the problem-solving spirit.
References
Berlin Packaging. (2020, January 26). Glass containers— Answers to frequently asked questions. Berlin Packaging. https://www.berlinpackaging.com/insights/packaging-resources/glass-containers-faqs
Contributors to Wikimedia projects. (2023, October 29). Glass coloring and color marking. Wikipedia. https://en.wikipedia.org/wiki/Glass_coloring_and_color_marking
Glass Packaging Institute. (n.d.). Glass coloring.
Reihey glass. (2023, December 13). The production process of daily glass bottles. Reihey. https://reihey.com/the-production-process-of-glass-bottles-and-glass-jars/